3D Printing Steampunk Props and Decor from Start to Finish
Can you actually 3D print steampunk props and decor that look like they belong on a workshop shelf and not a school science fair table? Yes, and the gap between the two comes down to three things: the model you start with, the material you print it in, and what you do to the piece after the print finishes. This guide walks through all three, plus what to do if you want the aesthetic but don’t own a printer.
As an Amazon Associate I earn from qualifying purchases and sometimes recommend products from other sellers at no extra cost you. For more details see my disclosure policy and privacy policy.
Most guides to this topic are really just guides to a model repository. Scroll, download, print, done. That’s fine if you want a generic gear-covered trinket.
It’s not fine if you want something that looks like it survived a century in an airship engine room. The difference is everything between “print complete” and “prop finished,” and that’s where this one lives.
🔍 Where to Find (and Vet) Steampunk-Style 3D Models
Thingiverse, Printables and Cults3D are the three big repositories, and steampunk is well represented on all of them because gears, cogs and Victorian ornamentation print well and photograph better. Search terms that work harder than “steampunk”: try “clockwork,” “airship,” “cogwork,” and the specific object you want (goggles, pocket watch, wall clock, candle holder) alongside the aesthetic term. Narrower searches surface designers who specialise rather than the same handful of generic gear models reposted under different titles.
Vetting a model before you commit filament to it means checking three things. First, the comment section and “Makes” gallery, if the platform has one, so you can see other people’s actual prints rather than the designer’s render. Renders lie about detail resolution far more often than photos do.
Second, the licence. Most steampunk models on these platforms sit under Creative Commons variants, and the difference between “personal use,” “non-commercial,” and fully open licences matters a great deal if you’re printing to sell rather than to keep. Read it before you print, not after someone asks where you got the file.
Third, look for a support structure note or a “print settings” tab from the designer. A model built with fine, overlapping ornamental detail and no guidance on supports is a model that will fight you later.
For anyone building a Maker’s Workshop habit rather than a one-off project, following a handful of designers who work specifically in this space pays off more than repeat searching. Their back catalogues tend to share a consistent scale and detail level, which makes props from different projects sit together convincingly on a shelf.
🎨 Filament and Material Choices for an Authentic Steampunk Look
Standard PLA in gold, bronze or copper tones gets you most of the way there for shelf and wall pieces, and it’s the easiest material to work with if you’re newer to printing. It’s not especially durable outdoors or under handling stress, but for decor that isn’t being picked up and worn daily, that trade-off is fine.
Metallic-filled PLA, the filaments with actual metal powder blended in, gives a heavier, colder-to-the-touch result that reads as more convincingly “real” before you’ve done any finishing work at all. It costs more, prints slightly differently (expect more nozzle wear over time from the abrasive metal content), but for a hero piece, a mantel clock or a centrepiece prop, it’s worth the difference.
Resin is the material to reach for when the model has genuinely fine detail: filigree, small gear teeth, delicate Victorian scrollwork. Resin captures detail that FDM printing simply cannot resolve at the same scale.
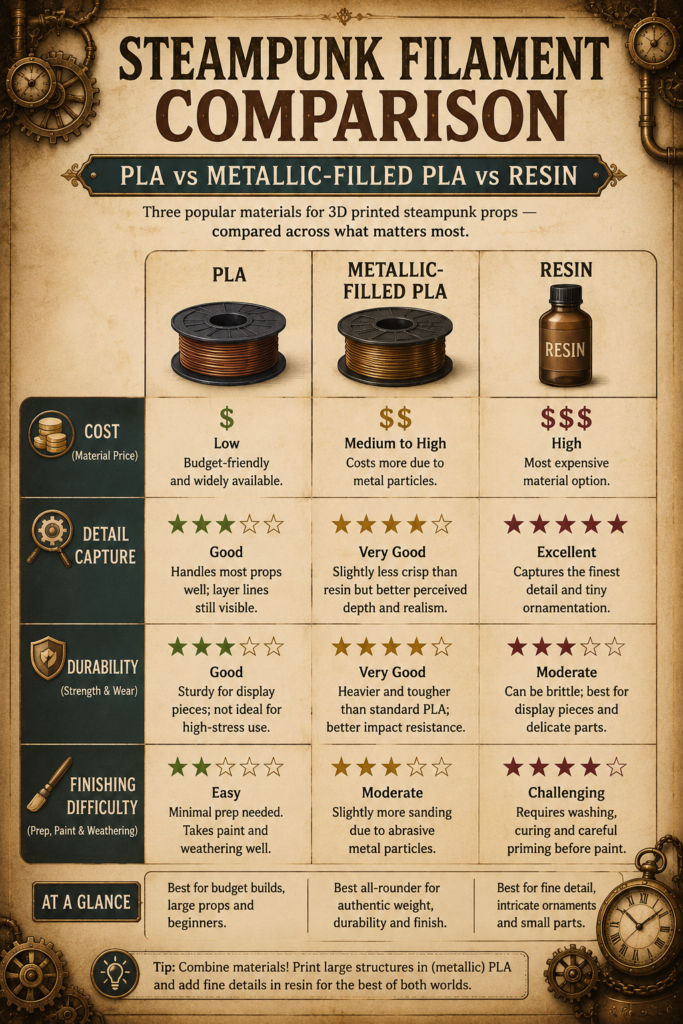
The trade-off is a more involved (and more toxic if handled carelessly) post-processing process of washing and curing, plus a smaller build volume on most consumer resin printers. For a full prop, FDM in a metallic filament; for the ornamental details that get attached to that prop, resin is often the better call.
Combining the two, print the structure in FDM and the fine ornamentation in resin, is a technique worth learning if you’re planning to make more than one or two pieces.
Colour choice matters as much as material. True steampunk decor rarely uses a single flat metallic. Bronze, copper and brass filaments printed in the same family but not identically, then layered with paint in the finishing stage, reads far more convincingly than one uniform gold print.
⚙️ Printer Settings That Actually Matter for Prop Work
You don’t need to become a slicer settings obsessive to print good props, but a few settings genuinely change the outcome and are worth understanding rather than leaving on default.
Layer height controls how visible the horizontal print lines are on the finished piece. For decorative props with visible detail, drop to 0.12 to 0.16mm rather than the 0.2mm default most slicers ship with. It roughly doubles print time on a large piece, but layer lines are the single fastest way to spot an amateur print from across a room, and reducing them is the highest-impact change you can make before you touch a paintbrush.
Infill matters less for appearance and more for weight and durability. 15 to 20 percent gives a prop enough heft to feel substantial without the long print times of a solid fill. If the piece will be handled often, a coat holder, a drawer pull, anything touched daily, bump that up to 30 percent or more so it survives the handling.
Supports are where steampunk models get genuinely tricky, because ornate detail, overhanging gear teeth and undercut scrollwork all generate support requirements that a simple print doesn’t have. Tree supports, available in most modern slicers, handle organic and ornamental overhangs better than standard grid supports and leave a cleaner surface once removed. Where a model has been designed specifically for printing (see the vetting section above), the designer’s suggested support settings are usually worth following exactly rather than guessing.
🛠️ Post-Processing: Turning a Plastic Print into a Weathered Artefact
This is the stage most “top ten files” guides skip entirely, and it’s the stage that actually makes a print look like a prop rather than a toy.
Sanding first. Even a fine layer height leaves some texture, and a light pass with 220 to 400 grit sandpaper on flat and simple curved surfaces smooths the plastic enough for paint to sit properly. Skip heavily detailed areas, sanding there does more harm than good.
Priming comes next, and it matters more than people expect. A filler primer in grey or black evens out the surface and gives paint something consistent to grip. Black primer specifically works well under metallic paints because it deepens the shadows in recessed detail without extra work.
For the metallic base coat, spray paints designed for models (Rub ‘n Buff, or dedicated metallic sprays) outperform brush-applied acrylics for coverage and finish. Apply in thin layers rather than one heavy coat, which avoids pooling in the detail work.
Weathering and patina is the step that separates a competent print from a genuinely convincing one. A dark wash, thinned acrylic or an oil wash pushed into recessed detail and wiped back from raised surfaces, mimics decades of tarnish sitting in the crevices of the piece. For copper and brass tones specifically, a green-tinged wash in the recesses reads as verdigris, the natural patina copper develops with age, and it’s one of the most convincing single effects in this whole process.
Real hardware finishes the job. Small brass gears, leather strips, actual screws or rivets rather than printed ones, and aged rope or chain, mixed in with the printed elements, is what makes a piece read as “found object” rather than “3D print.” A single real brass fitting on an otherwise printed piece does more for authenticity than another hour of paint work.
🔩 Assembly Tips for Multi-Part Prints
Larger steampunk props, wall clocks, lamp bases, multi-piece wall decor, are usually printed in sections and assembled afterwards, partly for build plate size reasons and partly because painting separate pieces before assembly gives better access to detail that would be hidden once joined.
Plan the paint order around the assembly order, not the other way round. Paint and weather each section fully before joining anything, then touch up only the seams afterwards. Trying to weather a fully assembled piece means fighting your own brush around parts you can no longer reach properly.
For joining, super glue works for small, low-stress connections. For anything load-bearing, a wall-mounted piece, a shelf decor item that will be picked up, plastic weld or a two-part epoxy gives a genuinely structural bond rather than a cosmetic one. Pin joints, small lengths of filament rod or brass wire, drilled and glued into both halves of a connection, add mechanical strength that glue alone doesn’t provide, and they’re worth the extra ten minutes on anything larger than a hand-sized prop.
🛒 Don’t Own a Printer? Buy Instead
Not everyone wants to learn a new hobby to get a steampunk piece on their wall, and that’s a completely reasonable position. Commissioning or buying finished pieces is a legitimate path through this whole topic, not a consolation prize.
Etsy remains the easiest starting point, searching “3D printed steampunk” alongside the specific object turns up individual makers, many of whom will do the exact print-and-finish process described above to a commission brief. Look for sellers with photos of previous work rather than renders, for the same reason vetting a model matters when printing it yourself, a photo tells you what you’re actually going to receive.
Commissioning directly from a maker, rather than buying an off-the-shelf listing, is worth it for anything that needs to match an existing colour scheme or fit a specific space. Expect to pay more and wait longer than an in-stock listing, but you get a piece sized and finished to spec rather than to a generic template.
📌 The Short Answer
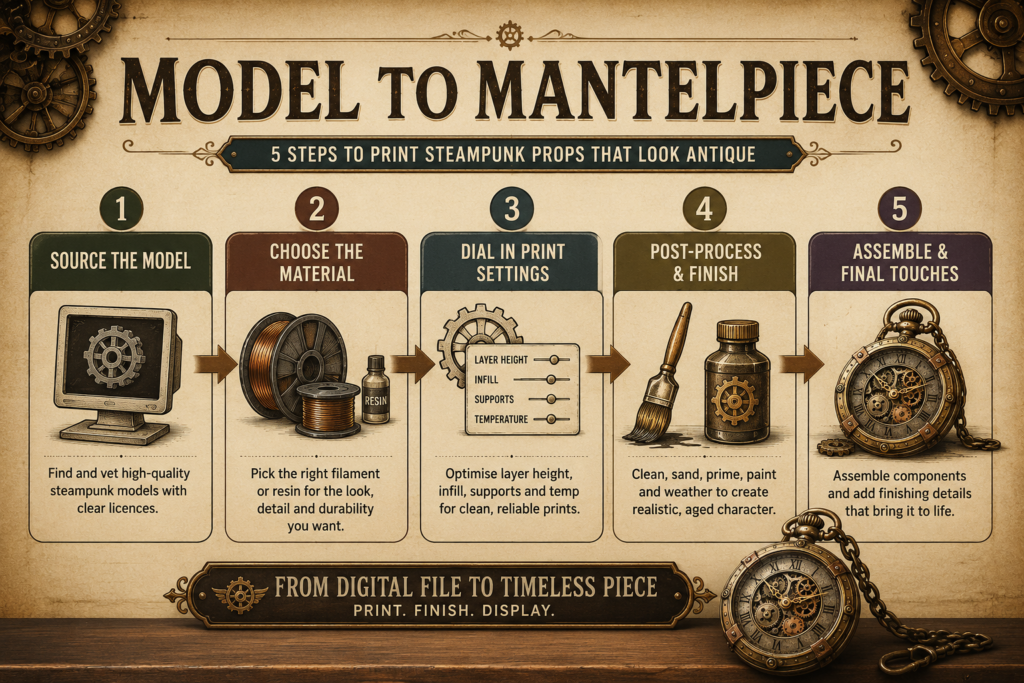
3D printing convincing steampunk props comes down to four decisions done well: source a vetted, well-detailed model rather than the first search result; choose filament (or resin for fine detail) that suits the piece rather than whatever’s already loaded; adjust layer height and infill rather than printing on default settings; and spend real time on sanding, priming, weathering and real hardware after the print finishes. Skip the post-processing stage and even a perfect print looks like a toy.
Do it properly and a $2 spool of filament turns into something that looks like it was salvaged from an airship. If printing isn’t for you, commissioning a maker gets the same result without the equipment.